 Render Studio Iray
Render Studio Iray is a new product from the mind of Colm Jackson of Runtime DNA. Render Studio, as a concept, goes back several years. The first product, if I recall correctly, was Render Studio for Vue. That was one of my first introductions to Vue and I bought Render Studio, which was (at the time) a handful of props and some lighting. Not long after Render Studio for Vue, the first Render Studio for Poser was introduced.
Render Studio for Poser was a hit. The base Studio was followed by several add-on packages. Newer versions of Render Studio were released later, timed with improvements and advances in the Poser software that they were designed for. When Poser introduced Global Illumination and true light casting surfaces, Render Studio for Poser responded with physically modeled light sources with light emitting surfaces. It may well have the been the first product of its type. This new version of Render Studio was also a hit and followed with multiple add-ons.
 And now we have Render Studio Iray, a new product, but quite a mature product with significant history and several development cycles behind it. OK, that's all well and good. But what is it? The store description tells us this: "Inspired by the quality and power of Iray, 'Render Studio' is packed with everything you need to produce incredible Daz Studio character renders. Including a full set of mesh and photometric lights that are complimented with many different colors and real world light temperatures. This set also includes three FX projectors with 'tons' of projections, a background and floor prop and a classic Infinity Cove studio prop (long time RDNA fans will instantly know what this is). Both props come with a multitude of texture and shader options.
Five pre-set, ready to render scenes (Just add figures) are also included. Along with a full selection of Iray render settings from an extremely fast 'Draft' setting to a full production 'Ultra' setting. A 10 page PDF user guide is included to help you get up and running within minutes."
That's quite a lot; but it doesn't really come close to describing the toolbox that Colm Jackson has designed and packed for us. Frankly, I'm at a bit of a loss to describe it myself. But that's what we're here for isn't it?
When you get down to it, its about the lights. Render Studio is a mix of photometric lights and Colm's own modeled lights (props with morphs to change the shape of the light source). Let's start with the photometrics, of which there 14 presets with various options.
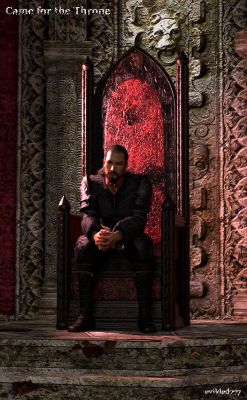
First we have the Background Lights, which serve a single purpose: to cast interesting light on the background itself. This is an interesting addition that you don't often see in light packages or even in "studio" type packages. These spotlights are parented to a null or invisible object that allows you to quickly adjust the angle and direction of the light. There are two initial types, one thin beam (which I used in the image to the left: Came for the Throne to cast a light on the frescoe lion head behind the throne) and one broad light designed to encompass a large area of the background surface. And additional 8 presets go along with these lights to further change the character of the light from a direct hard bean to a wide, diffuse light. These lights, while really quite simple, are so unique that just adding one of these can change the entire character of an image.
The second set of photometrics are all Rim Lights, 8 of them: 2 directly from the back, and 3 each from the right and left. Rim lighting is an essential technique that can be quite hard to get right. It can be used to enchance a light setup, drawing your figure out from the background, or it can be used as one of your primary light sources, creating drama. Came for the Throne uses a rim light from the right in this way.
 The third set of photometrics are the projector lights (Coulrophobia uses the Projector Above light with one of the material presets from the Projector Front collection); some may already be familiar with the concept of Projetors, but for those who are not these are three spotlights (one from above, one from the front and one aimed at the "back wall") that have a gobo or cookie in front of them (a flat surface that the light projects through) to create various effects. There are a total of 24 presets for the projector lights, but you can combine them and modify them in thousands of ways.
Like the Background Lights, the Projectors are a nice addition to this set that just adds to the creativite possibilities. I know it pushed me in directions that were unique... I think Coulrophobia is one of my best and most unique images to date.
The last photometric light is a Specular Light. This light, set to Specular Only is included for the express purpose of bringing out a nice highlight in the eyes.
So now we have to talk about the largest section of Render Studio Iray: the Mesh Lights. There are too many to list (this article already getting kind of long), so I am going to do my best to describe these lights, because they are the heart of the set and are quite unique.
The Mesh Lights are props, really one prop that consists of two pieces/suraces: the casing and the emitter. These props are modelled after real world lights that you might find in a photography studio or on a movie set. The casing is the actual body of the light which gives each light its unique shape and the emitter is the "bulb" or light emitting surface. There are 10 different colors to apply to the emitter and 14 different light temperatures that represent eveything a candle flame to a sunset.
I realize that its hard to describe these lights and get the full effect, so here's an illustration of just one of these lights with its preset shape. This is the Key Light Soft Left frm the Key Lights section of the Mesh Lights.


The illustration above left is the actual light prop itself, with the emitter surface highlighted. You can see that this is roughly in the shape of a large parabolic light that you might find in a studio. The illustration above right shows the morph dials on the light prop that created this shape (click either one for a larger image). As you can see from the morphs list, you can change this light quite drastically. There are a lot of possibilites with just this one prop, and that's not counting the options you have to change the color and character of the light emitted.
Luckily, Colm has included a number of presets for us, so we don't go crazy having to tinker with all the settings ourselves. The package includes presets for Hair Lights, Key Lights, Rim Lights, Side Lights and Soft Lights (15 individual preset shapes for the mesh lights). I'm no math wiz, but combine those 15 preset shapes with the 21 color/temperature options and you have quite a tool set arrayed for you.
 I haven't even touched on the background props (of which there are two: a floor and wall prop and a traditional paper roll type Infinity Cove and a hug selection of materials for each the cover a multitude of surfaces and effects, even bokeh and smoke) and we already have a package that is Swiss Army Knife, but I didn't mention the 19 Camera presets....
I've raved quite a bit here, and I hope given you an idea of the complexity and utility of this package. I'm going to note a few cons here, because I wouldn't be fair if I didn't.
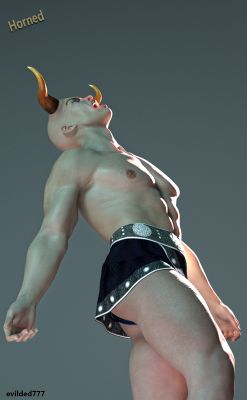
Its got a hefty price tag (full retail is $49.95). Is it worth that price? I'm going to say: yes. You won't find many packages that include this many preset options and modifiers that allow for even more flexibility. I've included 3 images here that would not have possible without Render Studio (Horned, to the right here, is, to date, my most popular image in my Daz Gallery and I whipped it together for this article in pretty record time using just 2 lights from Render Studio). Of course, you have to be the final judge on where the price point is acceptable for you.
The lights themselves are really bright. I recognize with this level of complexity, adding Tone Mapping settings would have just blown this out of the water... trying to encompass such a wide array of possibilities would have been a monumental and pointless task. But if you want to go that route, you can easily adjust the Tone Mapping settings yourself and tone down the lights to more plausible levels. Not a huge con, but... it had to be mentioned.
The Smart Content or metadata kind of sucks. This is disappointing. I expected better. I found the metadata so confusing and useless that I uninstalled the Connect version of this product and installed via DIM instead. Someone ought to look at that and do something about it.
Time to sum up I think. You need this. Yes, you do.